Wednesday, August 25, 2010

Homemade Hat Models

I have learned a lot since opening my Etsy shop.  Things are off to frustratingly slow start. The search for sales has lead me to reading and research on how improve my shop.  My cousin, whose Noodles & Milk shop has been quite successful, has been a great help and so has the Etsy seller's forum.  So I am pecking away at my improvements and knitting to build my inventory.  The theory is that if you build it, the sales will come...eventually. 

A large part of my learning curve deals with improving my product photos.  Pictures are extremely important when trying to sell something via Internet.  Lighting, backgrounds, and angles are everything.  I have been experimenting and learning a great deal.  You can see, or at least I can see, a marked difference between my early product photos versus those that I take now.  I am continually trying to improve.

One key aspect is how the product is modeled.  I make a lot of infant's and children's hats for my Etsy shop.  They are fast knits and I am trying to build up some inventory before branching out into longer term projects like sweaters and blankets.  Right from the start, I have had a dilemma in how to model my knitted hats for photos such that they look nice.   A picture of a knit hat laying flat on a table just doesn't quite do it.  For the best results, you really need to find a way to pose the hat such that it looks as though it is on a head. 

Initially, I approached the problem creatively. I tried using balls of yarn, dolls, teddy bears, glass vases, and anything else I could think of to try to achieve a head-like shape.  The vase and the yarn balls worked the best but they were still just off enough that I was unsatisfied with my results.  I am able to get my kids to model some of my hats.  However, as most parents can attest, it is tough to get preschool age children to stop moving and smile long enough for a good clear picture.  Also, this does not solve my dilemma for baby hats and little girl's hats.  (I am blessed with little boys.)
 
I decided what I needed was a mannequin, or rather several mannequins in different sizes, preferably gender neutral for maximum usability.  So I did a little Internet surfing for infant-, child-, and adult-sized mannequins and discovered that they are expensive.  If I had a brick and mortar store, then it might be a good investment but for a cottage industry, Internet shop, I just cannot justify that level of capital outlay yet.  So then I searched for just head forms.  My grandmother gave me a Styrofoam head form upon which to store my favorite fedora hat when I was in junior high.  I thought, perhaps, I might be able to find those in assorted sizes.  Well, you can't, or at least I can't.  I have been able to find them in adult sizes but evidently they don't make them in child or infant sizes. 

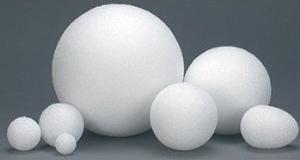
Then one day I am walking down one of the arts and crafts aisles at Walmart when I see a potential solution - Styrofoam balls of assorted sizes.  You know the kind; you paint them and string them together to make solar system models.  So I picked up two, one that seemed approximately 4 year old head sized and another that seemed approximately baby sized, and brought them home for about $5. 

When I got home I discovered that I still had a bit of a problem, Styrofoam balls are round and a human head is not.  My hats just did not fit on the balls very well.  So with not much to lose, I measured my oldest son's head, got out a steak knife, and began shaping the largest Styrofoam ball to match the measurements.  The whole process was horribly messy but  the serrated edge of my steak knife allowed me to shave off small increments for gradual shaping.  I took my time and eventually created a child-sized, head-shaped, hunk of Styrofoam in the the measurements I wanted.  Then I dug some unbleached muslin out of my fabric stash.   Using straight pins as anchors, I covered the newly carved Styrofoam head in fabric.  It turned out much better than I had hoped.  Thus encouraged, I grabbed the smaller Styrofoam ball, carved, and covered it as well.
Homemade Head Forms

Modeling Child- and Infant-Sized Hats
I have since added two ready-made adult Styrofoam head forms to my collection as well.  One of these is second hand and has been "decorated" by a child so I plan to cover it with some of my left over muslin before I put it to use.  You can pick these up new at Sally Beauty Supply, or some other similar such place, for about $4 each.

At some point a better method for modeling my smaller hats will present itself. Until then, my homemade, muslin covered head forms will do just fine. Now, perhaps if I am a really, really, good girl and pinch my pennies till they scream, Santa will bring me a  really nice 35mm digital SLR camera.  Well that is not really in the budget for this year, maybe next.

Tuesday, August 24, 2010

Lorica's Spring Toque

This is a variant of a hat I came up with several months ago.  I like this version much better and it's drawn some immediate interest on Ravelry so I am feeling pretty good about it.  The inspiration for this design came from my cousin's two little girls, who both love pink and purple and all things ruffly, lacy, and girly.  They've just moved to the Las Vegas area so cotton seemed the best choice of yarn.  It does get cool enough in the evenings in the desert to warrant a light weight hat during the winter months so I am hoping these do the trick. 

I used a Peaches & Creme ombre to make these and I just love how the yarn's color pooling worked out into a candy stripe effect.  I did one in pink and the other in purple.  The girls can, or perhaps my cousin should, decide who gets which color.  For those who are interested but don't knit, I will be making more of these for sale in my Etsy shop but I am certainly able to take custom orders for color requests. 

Note: I have test knit this pattern 3 times; however, I have not had a second set of eyes or hands review or test knit it yet. So if you find an error or if something is not clear in the instructions, please let me know so that I correct and/or improve the pattern.
------------------------------------------

Lorica's Spring Toque


You will need:
  • 29-in circular needles US #7 (or size to obtain gauge)
  • 16-in circular needles US #7 (or size to obtain gauge)
  • Set of 4 DPNs US #7 (or size to obtain gauge)
  • Yarn needle
  • Stitch marker

Yarn:  Worsted weight yarn (~150 yards) Samples pictured here were made with Peaches & Creme #183 Lilac Ombre and #144 Strbry Cream by Pisgah Yarn & Dyeing Co., Inc. - 100% cotton)

Gauge: 4 1/2 stitches per inch in stockinette stitch on US#7 needles

Size: 0-6 months (6-12 months, 1-2 years, 2 years+)

Pattern:
Beginning and Ruffled Brim:
Cast on 256 (288, 320, 352) stitches using the 29-inch circular needles.  Mark the beginning of the round with the stitch marker and join the ends of the round, being careful not to twist the stitches.
  • Round 1 - K2tog to the end of the round. 128 (144, 160, 176) stitches remain.
  • Round 2 - Switch to 16-inch circular needles.  K2tog to the end of the round. 64 (72, 80, 88) stitches remain.
  • Close-up of the lace pattern
  • Round 3 - Knit all stitches.
Lace Pattern:
Begin the lace pattern knitting as follows:
  • Round 4 - *YO, K2tog, repeat from * to the end of the round.
  • Round 5 - Knit all stitches.
Repeat Rounds 4 and 5 until piece measures 5 (5.5, 6, 6.5) inches from the start of the lace pattern knit.

Decrease Sequence:
Begin decreasing as follows:
  • Round 1 - *YO, K2tog, YO, K2tog, YO, K2tog, K2tog, repeat from * to the end of the round. 56 (63, 70, 77) stitches remain.
  • Round 2 - *K5, K2tog, repeat from * to the end of the round. 48 (54, 60, 66) stitches remain.
  • Round 3 - *YO, K2tog, repeat from * to the end of the round.
  • Round 4 - Knit all stitches.
  • Round 5 - Switch to DPNs.  *YO, K2tog, YO, K2tog, K2tog, repeat from * to the end of the round. 40 (45, 50, 55) stitches remain.
  • Round 6 - *K3, K2tog, repeat from * to the end of the round. 32 (36, 40, 44) stitches remain.
  • Round 7 - *YO, K2tog, repeat from * to the end of the round.
  • Round 8 - Knit all stitches.
  • Round 9 - *YO, K2tog, K2tog, repeat from * to the end of the round. 24 (27, 30, 33) stitches remain.
  • Close-up if finished decrease sequence
  • Round 10 - *K1, K2tog, repeat from * to the end of the round. 16 (18, 20, 22) stitches remain.
  • Round 11 - K2tog, repeat to the end of the round. 8 (9, 10, 11) stitches remain.
Finishing:
Cut yarn leaving a 5 inch tail.  Thread tail onto yarn needle and pull it through the remaining stitches.  Pull tight to close ring completely.  Thread the tail to the inside of the hat and weave the end.  Weave the end at the cast on edge.

Saturday, August 14, 2010

The Ashton Hat

My cousin is pregnant with her second child, a little boy this time.  I am very happy for her. Watching her prepare, via blog, for the new little guy has been fun. She is a very creative and talented woman and I am very proud of her.

My own kids are now past the baby stage so knitting tiny clothes is no longer something I can do for them. I just love knitting baby things though, so I try to do gifts for friends. My cousin's new baby has given me an excuse to test knit my Bottle Cozy pattern; a chance to begin experimenting with knitted bibs; and a reason to design a new baby hat pattern.

I elected to make this one 100% cotton because my cousin lives in Texas and it just doesn't get cold enough for wool there. I used a Peaches & Cream blue ombre that I already had sitting in my stash and I love how the color pooling created a striped effect through the seed stitch portion of the pattern. I will have to make a second hat with this yarn to see if it will pool that way again or if I just got lucky. Regardless, I love how this hat turned out! It's very cute and fast to knit and the textures are great.

Note:  I have not had a second set of eyes or hands review or test knit this pattern yet. So if you find an error or if something is not clear in the instructions, please let me know so that I correct and/or improve the pattern.

-------------------------------------------------------------------------
The Ashton Hat                            
You will need:
  • 12-in circular needles US #6 (or two sizes smaller than size to obtain gauge)
  • 12-inch circular needles US #8 (or size to obtain gauge)
  • Set of 4 DPNs US #8 (or size to obtain gauge)
  • Yarn needle
  • Stitch marker
  • Worsted weight yarn (I made the one shown here with Peaches & Creme #133 Shaded Denim Ombre by Pisgah Yarn & Dyeing Co., Inc. - 100% cotton)
Gauge: 4 stitches per inch in stockinette stitch on US#8 needles

Size: 0-6 months (I have yet to pattern test for larger sizes)

Pattern:
Beginning and Rib Cuff:
Cast on 64 stitchs using the small circular needles.
Mark the beginning of the round with the stitch marker and join the ends of the round, being careful not to twist the stitches.
For the first 1 1/2 inches, knit using K2, P2 pattern (2X2 Rib).

Seed Stitch Section:
Switch to larger circular needles and begin Seed Stitch pattern as follows:
  • Rnd 1 - K2tog, *P1, K1, repeat from * until 1 stitch remains, K1 (63 stitches remain
  • Rnd 2 - *P1, K1, repeat from * until 1 stitch remains, P1
  • Rnd 3 - *K1, P1, repeat from * until 1 stitch remains, K1
Continue in Seed Stitch pattern by repeating Rnd 1 and Rnd 2 until piece measures 4 1/2 inches from cast on edge.

Stockinette Section:
Begin Stockinette Stitch pattern as follows:
  • Rnd 1 - Increase in the first stitch by knitting in front and back of the same stitch, knit to the end of the round (64 stitches)
  • Rnd 2 - Knit to end of the round
Continue Stockinette Stitch pattern by repeating PatRnd 2 until the piece measures 5 1/2 inches from cast on edge.

Decrease Sequence:
Begin decreasing as follows:
  • Rnd 1- K6, K2tog, repeat to end of the round (56 stitches remaining)
  • Rnd 2 - K5, K2tog, repeat to end of the round (48 stitches remaining)
  • Rnd 3 - Knit
  • Rnd 4 - Switch to DPNs. K4, K2tog, repeat to end of the round (15 stitches on 1st needle, 15 stitches on secnd needle, and 10 stitches on third needle - 40 stitches total remaining)
  • Rnd 5 - Knit
  • Rnd 6 - K3, K2tog, repeat to end of the round (32 stitches remaining)
  • Rnd 7 - Knit
  • Rnd 8 - Knit
  • Rnd 9 - K2, K2tog, repeat to end of the round (24 stitches remaining)
  • Rnd 10 - Knit
  • Rnd 11 - K1, K2tog, repeat to end of the round (16 stitches remaining)
  • Rnd 12 - K2tog, repeat to end of the round (8 stitches remaining)
Finishing:
Cut the yarn leaving a 5 inch tail. Thread tail onto yarn needle and pull it through the remaining eight stitches. Pull tightly to completely close the ring. Thread tail to inside of hat and weave end. Weave end at cast on edge.

Hat can be worn with ribbed cuff up or down.